The Wenlin Tutorial
Contents
- 1 Step 1: Starting Wenlin
- 2 Step 2: Main Windows and Sub-windows
- 3 Step 3: Mouse Pointer Shapes and the Menu Bar
- 4 Step 4: Restoring Standard Options (Important!)
- 5 Step 5: Typing and the Insertion Point
- 6 Step 6: Selecting the Hand Tool
- 7 Step 7: Looking Up an English Word
- 8 Step 8: Looking Up a Chinese Character
- 9 Step 9: Viewing Without Editing
- 10 Step 10: Moving and Re-sizing Sub-windows
- 11 Step 11: Scrolling in a Window
- 12 Step 12: Pressing a Button for Stroke-by-Stroke Display
- 13 Step 13: Closing Windows
- 14 Step 14: Typing Pinyin with Tone Marks
- 15 Step 15: Clicking on a Syllable to Hear its Pronunciation
- 16 Step 16: Typing Characters by Phonetic Conversion
- 17 Step 17: Writing Chinese Characters with the “Brush”
- 18 Step 18: Looking up a Polysyllabic Word
- 19 Step 19: Moving the Insertion Point
- 20 Step 20: Selecting Text for Editing; Copying and Pasting
- 21 Step 21: Saving your Document to a File on Disk
- 22 Step 22: Opening a Document
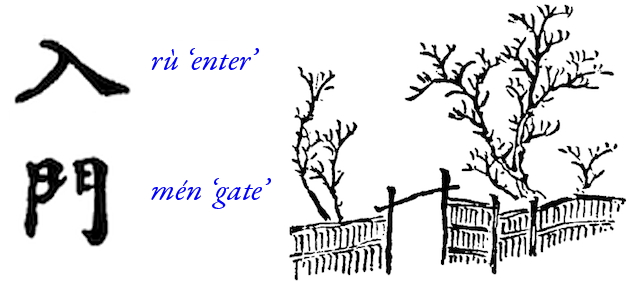
rùmén 入门 v.o. learn the fundamentals ◆ n. elementary course; primer – ABC Dictionary
You can benefit from reading this tutorial even when you’re away from the computer, but it’s really intended for hands-on use. If you turn on your computer and actively go through the 22 steps of the tutorial, you’ll soon be using Wenlin with confidence and pleasure.
You don’t need to know Chinese to follow this tutorial. Also, we try not to assume you’re a computer expert, so as we go along we’ll briefly explain some basic terms like mouse pointer, menu, and insertion point.
Step 1: Starting Wenlin
First, you need to know which operating system you have: Mac OS or MS-Windows. The operating system is the fundamental program that is always running whenever the computer is turned on; it makes it possible to run other programs. Wenlin works with both of these operating systems (cf. System Requirements), and mostly behaves the same on both, but there are a few differences, which we’ll point out as we go along.
- Otherwise, if you see a Microsoft® Windows logo

 on the screen (possibly on a little button labeled Start in one of the corners), then you have MS-Windows.
Wenlin requires a mouse, or some other kind of pointing device, such as a track pad or a pen and tablet. We’ll just call it a mouse from now on. To click with the mouse means to press and release the mouse button. If your mouse has more than one button on it, use the left or default button.
In this tutorial, we’ll assume that Wenlin is already installed on your computer, or that you’re using a Wenlin CD-ROM for which installation isn’t necessary.
You might make a mistake while following the step-by-step instructions. Even if you never make mistakes, your dog might trample the keyboard, or your cat might pounce on the mouse, or ... If you find yourself in a situation that you don’t understand or can’t find a way out of, try pressing the Escape (or Esc) key on the keyboard, or reading ahead a few steps. In particular, if you accidentally open a window and don’t know how to get rid of it by clicking in its close button, look ahead to Step 13 on “Closing Windows”.
To start Wenlin,
- • Double-click on the Wenlin application icon, which looks like this (at various sizes):
If you don’t see the icon, then of course you have to find it before you can double-click on it.
If you’re using the Wenlin CD-ROM, then the icon is in a window that opens when you insert the disc. Double-click on the CD-ROM icon if necessary to open the window.
If Wenlin is installed on a hard drive, there may be one or more “shortcuts” or “aliases” that “point to” the application. You can create these yourself in the usual ways for your operating system, and put them on the Desktop, Dock, or wherever you want. On MS-Windows, the setup program creates a shortcut automatically, so you can click Start, Programs, Wenlin. On Mac OS, the Wenlin application is normally inside the “Applications” folder.
On Mac OS, if you're running this version of Wenlin for the first time, you may be prompted to click on a triangle button to install the Tushuguan (dictionaries, etc.) in your “Documents” folder. You may click on that button and then proceed.
Step 2: Main Windows and Sub-windows
Wenlin displays text, documents, vocabulary definitions, lists, images, etc. in windows. A window is a container for text and images. (The Microsoft operating system also happens to be called Windows, or MS-Windows, but the word window is used for all computers and operating systems.)
MS-Windows
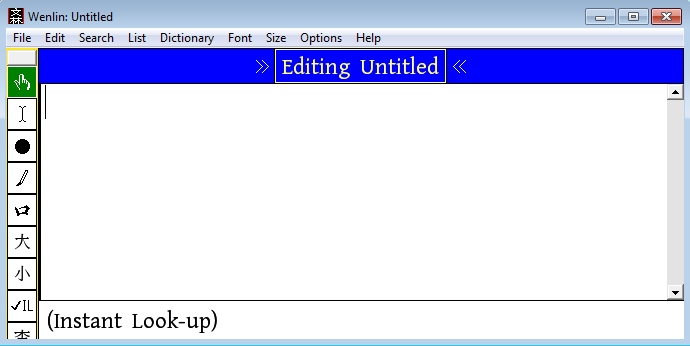
When Wenlin starts up on MS-Windows, it looks like this:
The three little controls in the upper right corner, on the title bar, are, from right to left: a close box (marked with an X) for quitting Wenlin, a maximize box for making the window as large as possible, and a minimize box for shrinking the window down to a button on the taskbar (the part of the screen that has the Start button on it). You can re-size the window by dragging on any edge.
Mac OS
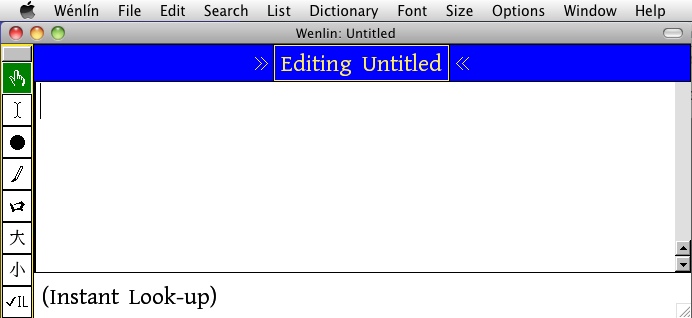
When Wenlin starts up on Mac OS, it looks like this:
You can re-size or move the window using the standard Mac OS controls. To move it, drag on the title bar; to re-size it, drag on the grow box (also called the re-size box) at the bottom right corner; to give it maximum size, click on the green zoom button (or maximize button). You can close the window by clicking on the red close button, or shrink the window down to an icon on the Dock by clicking on the yellow minimize button.
Window Features Common to Both Operating Systems
Wenlin has both main windows and sub-windows. A main window contains one or more sub-windows. (When you reach Step 7 below you’ll see a main window that contains two sub-windows.)
In the image above the main window displays the title “Wenlin: Untitled” in its title bar.
“Untitled” is the name of the sub-window, which has its own title bar below the main window’s title bar. Your new sub-window is called “Untitled” because it’s new and you haven’t given it a name of your own yet. The sub-window itself displays “Editing Untitled” in its title bar because the new empty document is open for editing.
At the moment, the sub-window’s title bar is highlighted (in this case, blue rather than gray). Whenever something is highlighted, it is, in one way or another, the center of Wenlin’s attention. We say that a window is active when its title bar is highlighted. You can type in a window when it is active and its title bar says “Editing” (typing is one way of changing or editing the text in a window).
Step 3: Mouse Pointer Shapes and the Menu Bar
Depending on the circumstances, the mouse pointer has different shapes.
In this Tutorial we’ll focus on the three most basic Wenlin mouse pointers.
| icon | name |
|---|---|
| Arrow | |
| Hand | |
| I-beam |
Try each of the following:
- • Move the pointer to the menu bar where the menu names File, Edit, etc., appear
- • Move the pointer to the interior of the Wenlin window
As you’ll see, these shapes provide a visual cue to where the mouse pointer is, and to what you can do with it. Chapter 1 includes a complete description of the various mouse pointer shapes and their meanings; in this Tutorial we’ll point out the important shapes as we go along.
Step 4: Restoring Standard Options (Important!)
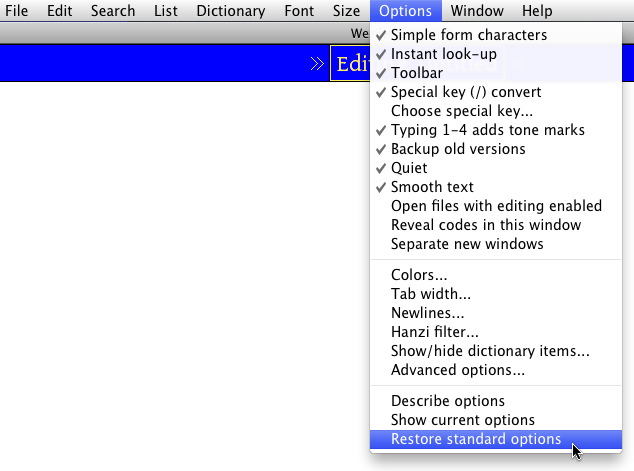
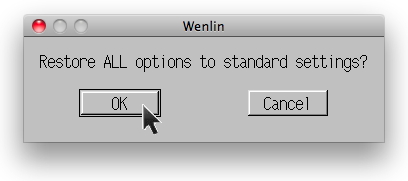
Wenlin has an Options menu, with which you can customize the program to suit your needs and preferences. For this tutorial, some options are assumed to have their standard (default) settings. But, maybe someone has already run Wenlin on this computer, and changed some of the settings. (Wenlin keeps track of the settings from one session to the next.) So, before going any further,
- • Choose Restore Standard Options from the Options menu
- A dialog box appears asking for confirmation
- • Click on the OK button (or press the Return or Enter key)
- The dialog box disappears
Step 5: Typing and the Insertion Point
If you happen to have a Chinese input method (other than Wenlin) installed, that's fine, and if you'd like, you can almost certainly use it to enter Chinese characters into Wenlin. However, in this step you'll type in English, and later you'll use Wenlin's own built-in methods for inputting Chinese characters. Your keystrokes need to go directly into Wenlin rather than get intercepted by another input method. Therefore, before you start typing, and throughout this tutorial,
- • Make sure that your keyboard is set for typing English
The blinking vertical line in the upper left corner of the window is called the insertion point. When you type, text appears at the insertion point, pushing it forward.
- • Type the English word dragon
If you make a mistake, you can use the Backspace key or Delete key to delete characters. You can use the left and right arrow keys to move the insertion point across text already typed.
Step 6: Selecting the Hand Tool
The hand tool is for looking up vocabulary items by clicking on them.
All of the toolbar items are described in Chapter 1.
Step 7: Looking Up an English Word
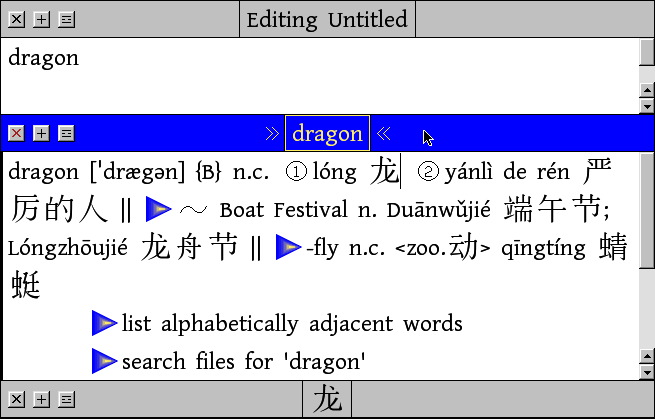
You can look up an English word in the English-Chinese dictionary by pointing to it and clicking with the mouse.
- • Point and click on the English word dragon
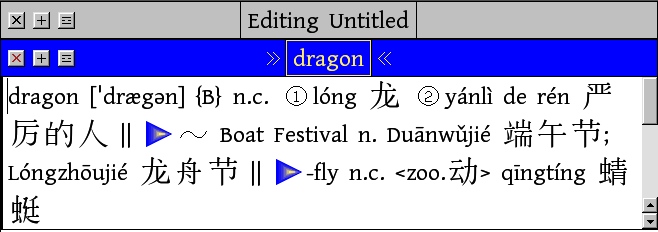
- A second sub-window opens, with a Chinese definition
Notice that the new sub-window is active: its title bar is highlighted (blue in the image above).
The other sub-window’s title bar (Editing Untitled) is no longer highlighted (it is gray).
You can make any window active by clicking on its title bar, but only one window is active at a time.
Step 8: Looking Up a Chinese Character
Looking up Chinese characters is just as easy. Whenever the mouse pointer is a hand shape ![]() , you can look up any vocabulary item in any window.
, you can look up any vocabulary item in any window.
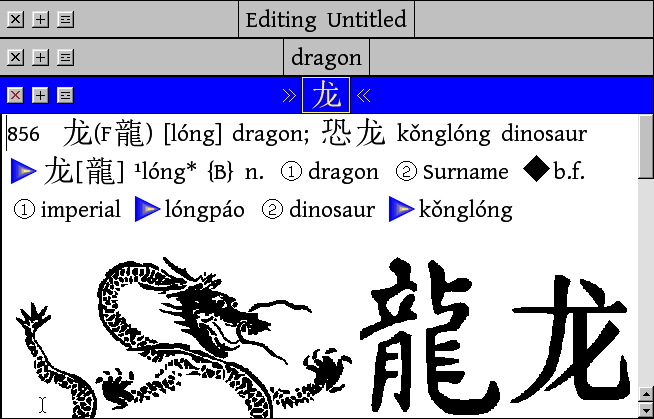
- • Click on the Chinese character 龙
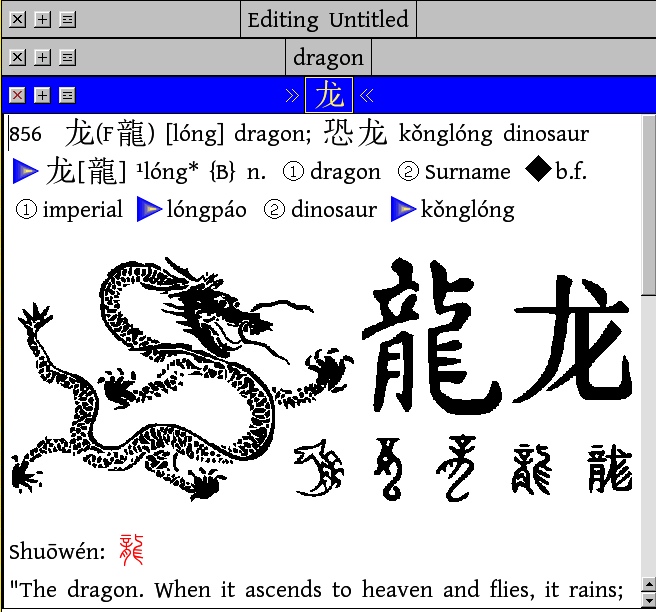
- A third sub-window opens
This is a fairly typical dictionary entry for a Chinese character (though not all characters have such nice pictures).
On the first line is the number 856, indicating that 龙 is the 856th most commonly used Chinese character.
Next we see 龙 which is the simple form of the character, and its full form 龍 in parentheses.
Then comes its pronunciation in pinyin, followed by the English definition ‘dragon’ and an example compound word ‘dinosaur’.
On the second line is the ABC Dictionary entry.
Below that are some pictures, including early forms of 龙 that were carved on oracle bones, or cast in bronze vessels long ago.
There is more material further below, some of which won’t be discussed or visible until we scroll down to look at it in just a minute. But for now ...
Step 9: Viewing Without Editing
The 龙 window is now the active window. (Its title bar is highlighted.) Also notice that the insertion point (an unblinking vertical line) is located in its upper left corner. Does that mean that you could type there and edit the definition of 龙? In fact, you could edit the definition of 龙. You can customize and expand the dictionary. However, there is protection against turning the definition into nonsense by accidentally putting your elbow on the keyboard.
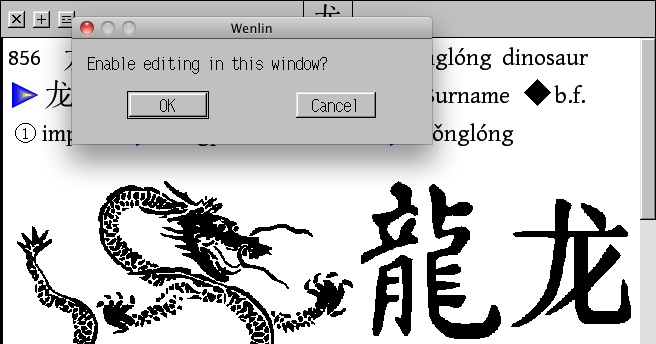
- • Try to type a letter (any letter, such as an “x”) in this window
- A dialog box appears, asking whether you want to enable editing in this window
(If you are running Wenlin directly from a CD-ROM, the dialog box is different: it says “File is Read-Only”; and there is only one button, Acknowledge. A CD-ROM is a “read-only memory”; dictionary entries can be edited only if Wenlin is installed on a writable storage device.)
Wenlin initially displays documents and dictionary entries in “read-only” windows. You can view these windows without accidentally changing anything. How can you tell if a window is read-only? The insertion point doesn’t blink, and the word Editing doesn’t appear in the title bar.
If you wanted to edit this entry, you could choose the OK button – but for now, let’s not edit the dictionary. (If you did choose the OK button, don’t panic. Simply choose Disable Editing from the File menu to turn the window back to read-only.)
- • Click on the Cancel button or press the Escape key
- The dialog box disappears
Step 10: Moving and Re-sizing Sub-windows
You can move a sub-window up or down by dragging on its title bar. (To drag with the mouse means to press the mouse button and then, while holding it down, to move the pointer to another location before releasing the button.)
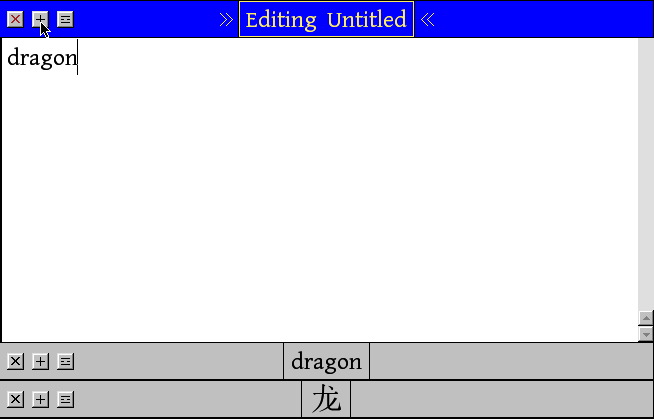
You can also maximize a sub-window by clicking on the maximize button [+] located in its title bar. That’s the one with the plus sign “+”, not the X. These two buttons are always next to each other.
(There is also a third button, [☲], called a Lí button, that separates out the sub-window into a new main window of its own; we won’t discuss that button further in this Tutorial. However, in case you're the kind of person who can’t resist the temptation to press a button that you're not supposed to press, or you press it by accident, here’s a secret. The [☲] Lí button has a magical property: it can be dragged as well as clicked. By dragging it, you can re-arrange sub-windows in any order you want, and move a sub-window from one main window to another. This will be explained in Chapter 1.)
By default, on Mac OS the [x] and [+] buttons are at the left end of the title bar (as in the illustration), while on MS-Windows they are at the right end of the title bar. (The operating systems have different conventions. If you'd like, you can move the buttons to the other side by holding down the Shift key while clicking on one.)
- • Maximize the top sub-window, whose title is Editing Untitled, by clicking on [+]
- The other two sub-windows slide down to the bottom of the main window
To make the contents of the middle sub-window (whose title is dragon) visible, drag it upward: point to its title bar, press and hold down the mouse button, then move the mouse.
- • Drag the middle sub-window half-way up towards the top of the main window
In this way you can change the heights of sub-windows. In Wenlin, all the sub-windows that share the same main window have the same width, and their title bars always remain visible (unless the main window is hidden or covered up by another main window).
- • Practice dragging on each of the three title bars
- Notice what happens when one title bar bumps into another
- • Maximize the bottom sub-window, whose title is 龙
- Once again the 龙 sub-window occupies most of the main window
Step 11: Scrolling in a Window
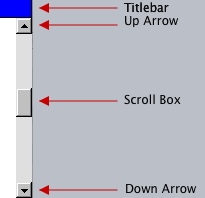
A window can hold an enormous amount of text, but only a limited amount can be displayed at one time. Whenever there is more text to see, Wenlin displays a scroll box in the scroll bar on the right edge of the window frame.
Scrolling with the Keyboard
You can scroll using the up and down arrow keys on the keyboard. Actually, the arrow keys cause the insertion point to move, and scrolling occurs when the insertion point tries to move above or below the window frame. Notice where the insertion point (an unblinking vertical line) is located in the window’s upper left corner.
- • Press the down arrow key on your keyboard once
- The insertion point moves down to the next line
- • Press the down arrow key repeatedly (or just hold it down)
- The insertion point keeps moving down; when the insertion point reaches past the bottom line displayed in the window, the window starts to scroll, until you stop pressing the down arrow key, or until there is no more text to be displayed
- • Press the up arrow key until the insertion point is back in its original location
Scrolling with the Mouse
Using the mouse, you can scroll by pointing to the up or down scroll bar arrow, and pressing the mouse button.
Depending on your operating system and how it is configured, the up and down scroll bar arrows are either at the top and bottom of the scroll bar (as shown in the illustration), or else they are together at the bottom of the scroll bar.
As you scroll, the scroll box moves up or down, giving you a visual indication of where you are in the text. Scrolling continues until you release the mouse button, or until there is no more text.
You can also scroll by dragging the scroll box up or down; this way you can quickly move to anywhere in the text.
The scroll box is like an elevator – it takes you where you want to go.
There is even a third way to scroll with the mouse: you can move up or down one window-height at a time by clicking in the area above or below the scroll box.
- • Practice scrolling in the 龙 window using the mouse
Unlike scrolling with the arrow keys on the keyboard, when you use the mouse to scroll, the insertion point stays anchored in the text – it moves on the screen along with the text, staying in the same position within the text.
Step 12: Pressing a Button for Stroke-by-Stroke Display
Now let’s further examine the dictionary entry of 龙. Below the pictures and description are some triangle buttons, which look like this: ▷.
- • Scroll up (if necessary) to the top of the 龙 window
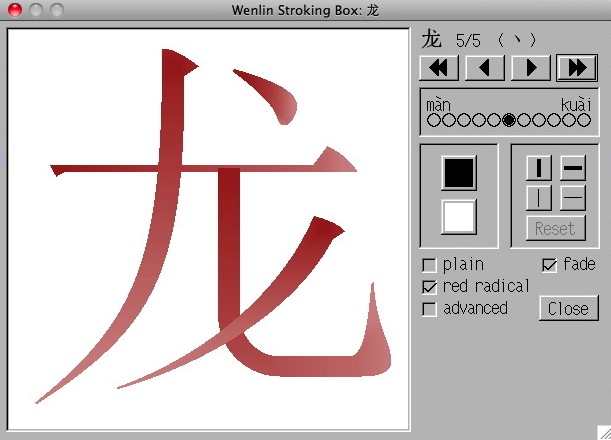
- • Scroll down (if necessary) until you see the triangle button: ▷stroke 龙 (5 strokes)
- • Press the button (by clicking on the triangle)
- The stroking box appears
- • Press the Enter or Return key
- The entire character is written on the screen, stroke by stroke
Using the stroking box, you can learn to write Chinese characters. If you want to control the action, you can press the space bar on your keyboard repeatedly to initiate each individual stroke. This makes it convenient to practice writing with a pen and paper, while pressing the space bar with the other hand. As you can see, there are many other controls available in the stroking box; these will be explained in detail in Chapter 7. When you’re ready to leave the stroking box,
- • Press the Escape (Esc) key
The stroking box disappears, and the screen appears as before.
You may be wondering about the full form character for ‘dragon’: 龍. You can learn how to write 龍 as well as the simple form 龙. To do so, you would click on 龍 where it appears in the top line of the 龙 window. The dictionary entry for 龍 includes this button:
- ▷stroke 龍 (16 strokes)
Close the stroking box, and ...
Step 13: Closing Windows
Each sub-window has a close button in its title bar (also called a close box). You can instantly close a read-only window (make it disappear) by pointing to its close button and clicking the mouse. A close button has an X in it, and is located at the left or right end of the title bar according to the convention of the operating system (Mac OS or MS-Windows).
When you try to close a window that you’ve edited, Wenlin takes notice, and offers you three choices: save the window’s contents to a file on disk, discard the contents, or cancel the request to close. But for the moment, let’s not close the editing window.
- • Close the lower two sub-windows
- Now only the Editing Untitled window remains open
Step 14: Typing Pinyin with Tone Marks
(If you’re already familiar with pinyin and tones, you can skip this paragraph.) Pinyin is a standard way of writing the sounds of Mandarin Chinese, using the English (Roman) alphabet plus “tone” marks. In addition to consonants (b, c, d,...) and vowels (a, e, i,...), every syllable has one of five tones: high level, rising, dipping, falling, and neutral. In pinyin, tones are represented by marks on top of the letters (the neutral tone is unmarked). Here are five different Mandarin single-syllable words:
| (1) | mā | (first, high level tone) | ‘mother’ |
| (2) | má | (second, rising tone) | ‘hemp’ |
| (3) | mǎ | (third, dipping tone) | ‘horse’ |
| (4) | mà | (fourth, falling tone) | ‘curse’ |
| (0) | ma | (neutral tone) | ‘yes-or-no?’ |
A difference in tones is just as significant as a difference in consonants or vowels.
With Wenlin, typing tone marks is easy: you simply type the number after typing the syllable. You can add a tone mark when the insertion point is either inside the syllable, or just to the right of the syllable. The result will be the same, since Wenlin automatically puts the tone mark on the appropriate letter in the syllable.
Now try it:
- • Press the space bar to insert a space after dragon
- The insertion point moves a little further beyond the word dragon
- • Type long2
- A digit 2 does not appear. Instead, the rising tone appears above the syllable: lóng
If you ever need to write numbers instead of tone marks (for example long2 instead of lóng, or long3 instead of lǒng), you can disable this feature by turning off Typing 1-4 Adds Tone Marks in the Options menu.
Chapter 4 will explain how to type ü (u with two dots) with and without tone marks.
Illustrations of tones from 《芥子园画谱》 Jièzǐyuán Huàpǔ ‘Mustard Seed Garden Manual of Painting’ [1679-1701]
Step 15: Clicking on a Syllable to Hear its Pronunciation
The Chinese syllable lóng doesn’t sound exactly like the English word long – the vowel is closer to oo in book, and the rising tone makes it sound like a question.
To hear that, let’s make Wenlin play a recording of this syllable. You can hear the pronunciation of any Mandarin Chinese syllable, simply by clicking on it where it’s written on the screen in pinyin (with tone mark), using the mouth tool.
- • Click on the mouth tool (
 ) in the toolbar
- The mouse pointer has the mouth shape when you point to text
- • Click on the syllable lóng that you just wrote
- A recording of the pronunciation is played
You can choose whether to hear the syllable pronounced in a woman’s voice (June Peijun Chen) or a man’s voice (Prof. Samuel Hung-nin Cheung).
When the mouth tool is selected, one of the characters 男 nán ‘man’ or 女 nǚ ‘woman’ is displayed beneath the toolbar. By clicking on that character you can toggle between the two voices.
When you look up any Chinese character, the pronunciation(s) are shown in [square brackets] on the top line of the dictionary entry. You can click there when you want to hear the pronunciation. Details about pronunciation are in Chapter 11.
When you’ve heard enough,
You’re more than halfway done with this tutorial. If you’re not too excited to take a break, now might be a good time for one. The next step is a long one, in which you’ll learn how to type Chinese characters. When you’re feeling refreshed ...
Step 16: Typing Characters by Phonetic Conversion
How can you type Chinese characters on an ordinary keyboard? In Wenlin, the primary method is to type the pronunciation in pinyin and then to convert the pinyin to Chinese characters.
In Chinese text, each character represents one syllable, so to type each character you need to type one syllable of pinyin. You don’t have to specify the tone of the syllable (though, as you’ll see shortly, sometimes it’s helpful to specify tones).
Let’s type the Chinese character for ‘dragon’. Its pronunciation is lóng, which you have already typed.
- • Press the space bar to insert a space after lóng
- The insertion point moves a little further beyond the word lóng
- • Type lóng again
- The insertion point is just to the right of the second lóng
- • Choose Convert from the Edit menu
- The pinyin is replaced by 龙. (If the Simple Form Characters option were off, we would obtain the full form 龍 instead of the simple form 龙.)
- • Press the Return or Enter key to confirm the replacement
It’s not very convenient always to be choosing Convert from the Edit menu. There’s a shortcut: simply press the special convert key, which, by default, is the slash key (/). (Don’t confuse it with the backslash key: \ ) The shortcut only works when Special Key Convert is turned on in the Options menu – that’s one of the reasons why you chose Restore Standard Options earlier in this tutorial. In case you ever want to use the slash key to type slash characters, you may occasionally want to turn off Special Key Convert. (You can also choose a different special convert key; Chapter 2 gives details.)
We didn’t need to specify the tone for the syllable lóng above. Although there are quite a few characters pronounced lōng, lóng, lǒng or lòng, we could have simply typed long without a tone mark, we would still have obtained 龙 since it’s the most common of all those characters. There are many similar-sounding words in Mandarin, so phonetic conversion often yields many alternatives. When you use phonetic conversion, specifying tones helps to reduce the alternatives.
Let’s type another one. The character for ‘tiger’ is 虎 hǔ with the third (dipping) tone.
- • Type hu3
- The insertion point is just to the right of hǔ
- • Press the special convert key (/) (same as choosing Convert from the Edit menu)
- The pinyin is replaced by the Chinese character 虎
Now, before you do anything else, notice that there are several characters appearing in what we call the conversion bar:
You now have a choice between all these characters that are pronounced hǔ. They’re arranged from left to right, starting with the one you’re most likely to want. You can see their definitions by pointing to them (but not clicking). (This is Instant Look-up.) You can choose a character by clicking on it, or by typing its number (虎 is 1), or by highlighting it with the left or right arrow key and pressing the Return or Enter key. Since 虎 is already highlighted,
- • Press the Return or Enter key to confirm the replacement
- The conversion bar is dismissed
What if we hadn’t specified the tone for 虎 hǔ? Let’s see what happens:
- • Type hu
- • Press the special convert key (/)
Where is 虎 hǔ? There are some characters pronounced hū or hú, that are more common than 虎 hǔ ‘tiger’, so 虎 isn’t the first character in the list (it’s number 5). When there are too many characters to fit in the conversion bar simultaneously, a button is displayed at the right end, with a number telling how many more characters there are (361 in the illustration). By clicking on the button, you can obtain those additional characters. (Note: depending on the setting of Hanzi Filter... in the Options menu, described in Chapter 2, you might see a smaller number than 361.)
There’s an even better way to type Chinese characters, when they form polysyllabic words or phrases that are in the dictionary. For example, ‘tiger’ in Chinese is very often 老虎 lǎohǔ rather than just 虎 hǔ. (老 lǎo means ‘old’ or ‘venerable’ – an expression of respect and a prefix in some animal names.)
- • Type laohu
- • Press the special convert key (/)
- • Press the Return or Enter key to confirm the replacement
Since there’s only one word pronounced laohu (regardless of tones) in Wenlin’s dictionary, there’s no need to specify the tones or to choose between alternatives.
Here’s how to type a whole sentence in Chinese characters:
- • Press the Return or Enter key to start a new line
- • Type xuexi/zhongwen/hen/rongyi/./
- The result is: 学习中文很容易。
Chapter 4 will discuss more details of the Convert command.
Step 17: Writing Chinese Characters with the “Brush”
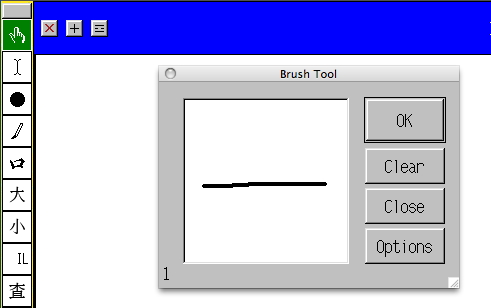
Besides phonetic conversion, Wenlin provides a more direct way to write a Chinese character. Using the brush tool, you can actually write a character by hand, using the mouse (or pen input device). If you’ve never written a Chinese character before, now is your opportunity!
- • Make a horizontal line from left to right (hold down the mouse button until done)
- • Click on OK, meaning that you’ve finished writing a character
- The Chinese character 一 yī ‘one’ appears at the insertion point
You can move the box’s window by dragging on its title bar (along the top); this may be necessary, if the insertion point happens to be covered up.
If Wenlin doesn’t recognize the character you write, it rudely beeps at you. Once you’ve succeeded with a single horizontal stroke, you might try some other characters. You must use the same “standard” stroke count that Wenlin uses, in the standard order. (There is an option to ignore the stroke order, but it’s better not to use it.) If you don’t know any Chinese characters yet, try writing 二 èr ‘two’, which looks like an equals sign “=”; and 十 shí ‘ten’, which looks like a plus sign (write the horizontal stroke before the vertical stroke).
To recognize the character you write, Wenlin compares it with all the characters with the same number of strokes, that can be written in the stroking box. (For example, Wenlin can write over a thousand different eleven-stroke characters.) The most similar character is found, based on the stroke positions. Please don’t be surprised or offended if Wenlin can’t always recognize the characters you write – computer programs are fast, but not intelligent! In general, there is more than one “correct” way to write a Chinese character; at least the authorities don’t always agree with each other. But Wenlin only has one way of writing each character. Chapter 7 describes the stroking box and the standards on which Wenlin’s stroke counts and stroke orders are based.
- • Finish playing with the brush tool – click on Close if it’s still open – and ...
伏羲 Fú Xī
Legendary first emperor and inventor of writing
Step 18: Looking up a Polysyllabic Word
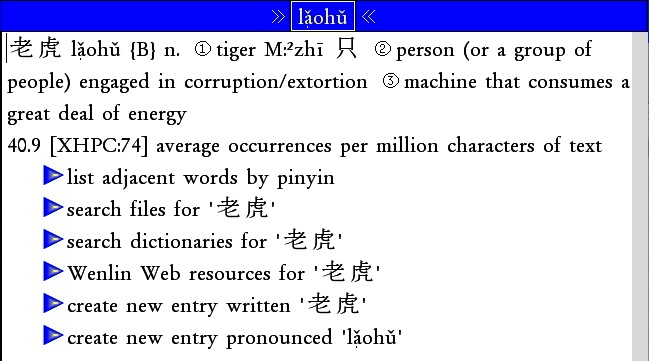
Wenlin also has dictionary entries for Chinese polysyllabic words (or phrases, or expressions written with two or more Chinese characters). In this step, you’ll look up the word 老虎 (lǎohǔ ‘tiger’), which you have already written on the screen in Step 16. If you can’t find it immediately, take your time; you might find Instant Look-up helpful: when you point to the word 老虎, its one-line definition is displayed at the bottom of the screen. (Or you can write it again.) When you’ve found the word 老虎,
- • Point
 to the first character in the word: 老
 - • Press and hold down the mouse button (don’t release it yet)
- • Point to the last character in the word: 虎
- The whole word 老虎 is highlighted
- • Release the mouse button
- A window opens
The new window contains the definition of the word. Chapter 5 will further describe dictionary entries. You can customize Wenlin by adding new words, and by editing the definitions and explanatory material for any vocabulary item. Chapter 9 will explain how to edit Wenlin’s dictionaries.
- • Now, close the window (by clicking its [X] close button)
Step 19: Moving the Insertion Point
You can move the insertion point using the arrow keys. You can also move the insertion point using the mouse, if you first select the I-beam tool (![]() ). This is often faster than using the arrow keys.
). This is often faster than using the arrow keys.
The reason it’s necessary to select the I-beam tool is that Wenlin always tries to look up whatever text you click on if the hand pointer (![]() ) is active.
) is active.
Let’s use the mouse to move the insertion point into the middle of dragon.
- • Select the I-beam tool
 from the toolbar
- The pointer is now an I-beam shape when it’s inside a window
- • Move the center of the pointer until it’s between the letters “a” and “g” in dragon
- • Click the mouse
- The insertion point appears between the letters “a” and “g” in dragon
Notice that the insertion point and the mouse pointer are two different things! (Even some advanced computer users are confused about this.) When you move the mouse around, the insertion point doesn’t move, it stays where it is, blinking. It’s called the “insertion” point because, now that you’ve moved it between the letters “a” and “g” in dragon, you can insert text there:
- • Type the letter “x” three times, using your elbow
- Now it says draxxxgon – Oops! A mistake!
- • Choose Undo Typing from the Edit menu
- The “xxx” disappears
By choosing Undo... from the Edit menu you can immediately recover from various editing mistakes – a useful feature to keep in mind.
Step 20: Selecting Text for Editing; Copying and Pasting
| If you’re already familiar with copying and pasting with other software, you can skip ahead to Step 21 – just remember to use the I-beam tool to select (highlight) text. |
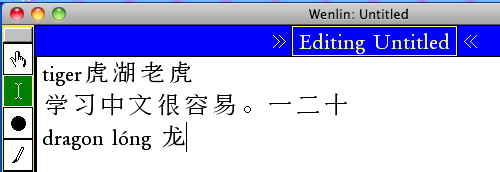
With the I-beam tool (![]() ), you can use the mouse to select text for editing. Selected text is highlighted text – the colors of the text and the background are changed. To illustrate this, let’s select the text dragon lóng 龙 :
), you can use the mouse to select text for editing. Selected text is highlighted text – the colors of the text and the background are changed. To illustrate this, let’s select the text dragon lóng 龙 :
- • Point “I-beam” to the left side of the “d” in dragon
- • Press and hold down the mouse button
- • Point to the Chinese character 龙 that is next to dragon lóng
- The text dragon lóng 龙 is all highlighted
- • Release the mouse button
- The highlighted text is now selected. Where has the insertion point gone? In a sense, the highlighted text is the insertion point. The insertion point has been stretched out into the selection. (The highlighted text doesn’t blink, though.)
Earlier, we said: “When you type, text appears at the insertion point, pushing it forward.” This is still true, even when the insertion point has become a selection. If you type something now, it will replace the selection. But first, make a copy of dragon lóng 龙 :
- • Choose Copy from the Edit menu
- Although nothing appears to have changed, the selection has been copied to the invisible clipboard
- • Type the English word tiger
- The selection is replaced by tiger, and the insertion point ends up between the r in tiger and the character 虎
- • Press the space bar to insert a space between tiger and 虎
- • Press the down arrow key three or four times
- Now the insertion point is at the end of all the text you’ve typed
- • Press the Return or Enter key to start a new line
- • Choose Paste from the Edit menu
- The copied text dragon lóng 龙 is pasted from the clipboard, at the insertion point
Chapter 1 and Chapter 8 give details on editing documents.
Step 21: Saving your Document to a File on Disk
Let’s save the contents of the Untitled window to a file on disk, even if you haven’t written anything important in it, so that you’ll know how to save important documents when you write them.
- • Choose Save As... from the File menu
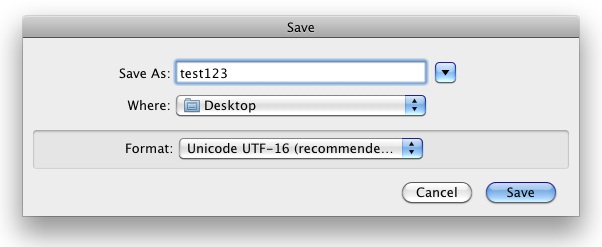
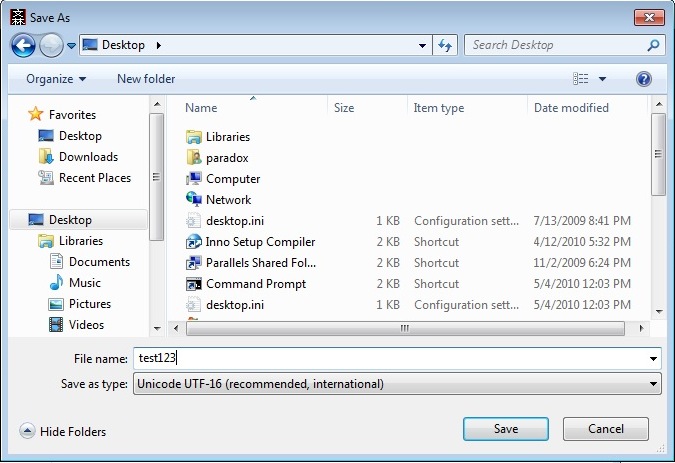
- Wenlin’s “Save As...” dialog box appears.
The appearance of the dialog box, and the instructions for using it, are different depending on the operating system (Mac OS or MS-Windows). In any case, there are three things to specify:
- (1) a name for the file;
- (2) a location for the file; and
- (3) a format for the file.
For now, don’t specify a file format, simply leave it as Unicode, which is the default. You only need to specify the name and location.
Since we don’t know what folders exist on your computer’s hard disk (and you can’t save anything on a CD-ROM), let’s save the file on the Desktop, a location that’s sure to exist.
For Mac OS, the dialog may look more or less like this. It’s an ordinary Save As... dialog (with the addition of the Format menu, which you should just leave alone, with the recommended setting, Unicode UTF-16).
- • Type test123
- The name “Untitled” becomes “test123”
- • Choose Desktop from the Where menu
- The file will be located on the Desktop
- • Click on the Save button
For MS-Windows, the dialog may look more or less like this. It’s an ordinary Save As... dialog (with the addition of the Save as type: menu, which you should just leave alone, with the recommended setting, Unicode UTF-16).
- • Type test123
- The file name “Untitled” becomes “test123”
- • Click on Desktop
- The file will be located on the Desktop
- • Click on the Save button
For either operating system, if there was already a file called “test123” in the specified location, then Wenlin asks you (in another dialog box) whether it’s OK to replace it. In that case, it’s OK to replace the old file – probably you or someone else already did this tutorial on this computer, anyway why would anyone call an important file “test123”?
When the file has been saved, the window’s title bar displays the new name “test123”.
Step 22: Opening a Document
Now you can be reasonably certain that your document has been saved. To make sure, let’s close it and open it again. There are two ways to open a file: (1) find the file’s icon (using Windows Explorer or Mac OS Finder) and drop it onto the Wenlin icon; or (2) using the Open command. We’ll describe the latter method here.
- • Choose Close from the File menu
- Your document disappears from view
- • Choose Open... from the File menu
- A dialog box appears
Like the Save As... dialog box, the Open... dialog box looks different depending on the operating system, but what you need to do is essentially the same.
- • Navigate to the Desktop, as before
- (That’s the location where you saved the file in the previous step)
- • Click on the name “test123”
- (You may need to scroll down, or start typing “test123” until it’s visible)
- • Click on the Open button
Now a new window should appear, displaying your document.
If you didn’t succeed in opening “test123”, maybe you accidentally chose a different location that then Desktop when you saved the file; in that case, you can try again to write some text, save it (paying careful attention to the location), and re-open it.
Once you’ve succeeded, you can be confident that in the future, when you create a document that actually contains some important text, you’ll know how to save it permanently on disk and open it up again later on. To be really safe, you should save often (in case of a software or hardware failure), and always save two copies on two different disks (in case a disk gets lost or damaged). Also, use more permanent and meaningful names than “test123”.
If you want to delete the file “test123”, you can drag its icon from the Desktop into the trash (Mac OS) or recycling bin (MS-Windows).
End of Tutorial!
Congratulations on finishing the Wenlin Tutorial. You’ve covered a lot of material. You might want to review what you’ve learned, and then go ahead and continue exploring whatever parts of Wenlin and Chinese look interesting to you. There are still many features that we’ve barely mentioned, such as flashcards and searching. The remainder of this guide provides details.
花 huā ‘flower’
![]() | Previous: Installation | Next: 1. Basic Operations | Contents |
| Previous: Installation | Next: 1. Basic Operations | Contents |

